Daley Train Log
Page 52
I have decided to begin assembling some of my kits for rolling stock. Beginning with what appears to be the easiest, I have opened the box for the Proto 2000 Series 52' 6" Drop End Mill Gondola. The kit # is 84491.
The box contains the following description about the prototype:
"This style of steel mill gondola was first designed and built by the Greenville Steel Car Co. in 1940 for the Erie Railroad. The gondola has a 70 ton capacity with a 52' 6" bed. Its innovative design includes drop ends which allow for even longer cargo. When carrying longer loads it usually travelled with a flat car at each end. The flat cars served as 'spacers' to allow room for the extended cargo. This gondola could carry just about any kind of load, from structural steel to lumber and even coal.
This versatile 'Greenville-design' car quickly grew in popularity. After World War II, numerous railroads purchased Greenville-style mill gondolas and this design became the unofficial industry standard for more than 20 years. Whether in original or modified form, many of these cars lasted into the 1970's and some were still in revenue service as late as the early 1980's."
As one usually sees at the top of any set of assembly instructions: "Before you begin: Read the instructions carefully before beginning assembly."
 |
|
the complete kit |
body |
In this case I see an immediate difficulty. The instructions give alternative instructions for two different groups of railways. Unfortunately the CNR is not listed in either group, although the car is painted with a CNR color scheme and number. This is not critical as I can simply pick one group and go with it, but it would be nice to do "the right thing". Of course that is also assuming that this car actually existed on the CNR.
Before beginning, I will spend a little time seeing if I can find additional information about this car and its place with the CNR inventory of rolling stock.
"The Best of Mainline Modeler's Freight Cars, Book 1" (1991) contains information on this car as it was originally built for the Chicago North Western, Southern Pacific and Missouri Pacific. All of the photos show a dimpling or waffling of the side panels but this is not a feature of the model in the kit.
Now to see what I can find on the Web. Ian Cranstone's "Canadian Freight Cars" does not list any cars with the number 55069. Also his list primarily mentions Hart Gondolas rather than Greenville. I am prepared to assume that this car has no prototype on the CNR but that it still is a good model of the Greenville gondola car.
I am beginning to see the value of an accurate prototype. I wonder if any of my cars pass this test?
Now to begin the construction.
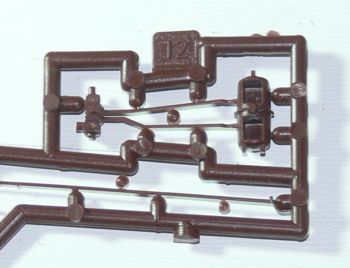
The first step is to align the underframe to the car body (without gluing) to be sure the orientation is correct. This took me about 4 tries before I could see that it made any difference. The next step is to test fit the Air Reservoir/Triple Valve to the body bottom. It is worth noting that these pieces are very small and delicate and great care must be taken in separating each piece from the sprue.
 |
 |
Air Reservoir/Triple Valve
|
in place |
I can still see small pieces of left over sprue on the "pipes" between the reservoir and the triple valve. I wonder if there is an easy way to remove this (e.g. using a Dremel rotary tool). I need to ask someone.
A google search has been helpful. There is a tool called a sprue cutter that does a fairly good job of cutting the piece from the sprue. Then use a file or 400- 600 grit sandpaper to smooth the cut. I have not found anything that specifically discusses handling very fine parts such as my air reservoir. One article specifically says to not use a rotary tool as it removes plastic too quickly and/or melts it.
The real solution is to take one's time, be very careful, and do everything very slowly. A sharp blade is also essential.
Isolating the one piece brake assembly from the sprue was one of the most meticulous processes that I have ever attempted. Here it is:

This has now been cemented to the body. The couplers and the truck assemblies still need to be attached to the undercarriage. But this has been a promising beginning. There are not a lot of pieces in this kit, but the pieces that exist are very small and require care to assemble. I am enjoying this.
Total time today on back-ground searches and assembly: 5 hours.