Model Train Journal

May 2006 to present

January, 2007

Next Month

Model Trains 07-01

January 2

Model Trains Index

9:00 am Just before the new year I bought a package of 6 coal loads (Magnuson 439-565 HO Bethgon) for use with my 100 ton quad hopper cars.

I tried fitting these loads but it became immediately clear that they would all require some trimming before they would fit in the cars. I spent an hour doing this and now have 4 of the 6 coal loads installed in cars. 10:20 am

SUMMARY of the session: Many sessions are like this. I spend an hour or so fiddling with some detail and slowly make progress.

8:30 PM I just finished trimming the remaining two coal loads. That completes another small task. The coal looks really great in the cars.


Model Trains 07-02

January 3

Model Trains Index

6:20 PM Earlier this afternoon I spend about an hour working with my model train layout.The original idea was to simply take a couple of photos of the coal cars with their new loads in them. However when I tried to roll the first car under the coal mine structure the load snagged on the underside of the structure.


It quickly became apparent that the problem was caused by the foam underbed for the track which had the effect of raising the track by about 1/4". My solution was to insert a base under both the mine structure and the track while removing the foam underbed for that section of the track. Here are 4 images of the result.

The base still needs to be painted black.

SUMMARY of the session: I continue to slowly improve the layout as little glitches are noticed and overcome.


Model Trains 07-03

January 4

Model Trains Index

7:40 PM


I put in about 4 hours today laying foam roadbed and nailing down track in Pine Ridge (easy), the Channon (easy) and Queenston (difficult). The difficulty emerged when I realized that there was not enough room for 3 sets of track on one side of the meat packing plant and two sets of track on the other side. The solution was to move all of the buildings and track about an inch toward the center of the layout. It took a while to remove the nails from what had already been done and to then relay and nail down the new layout. This also resulted in a change to the overall track plan within Queenston and the moving of two buildings (a flour mill and a propane tank) to a totally different location. I used up almost two complete packages of foam roadbed as well as placing four new turnouts within the town area.

In the process of moving the track and inch to the left (see bottom left photo) I had to disconnect one of the electrical leads to the track. I must remember to reconnect this tomorrow. The angular track (bottom left photo again) connecting the three tracks on the left to the two tracks on the right is a totally new track.

The only track remaining to be nailed down is within the Coaldale classification yard. However I will need to buy one more package of the foam underbed in order to complete this.

I am using 5/8" x 18 Ga. wire nails (National brand N278-127 V7710), which I was able to find at Totem Hardware, to nail the track down. This works extremely well.

I am also having some preliminary thoughts about adding a loop around the entire room and about a foot or so above the existing layout. This would be a very simple loop with three track widths, two for a loop going in each direction and one for a few passing sidings. This would allow me to create a few long haul trains (e.g. a passenger train, a modern grain train, the turbo) and simply let them run around the perimeter. Just a thought at the moment.

SUMMARY of the session: I made substantial progress with the track layout today. It is almost finished, except for the placement of the under the track uncoupling magnets.


Model Trains 07-04

January 5

Model Trains Index

12:10 PM


I put in another 3 hours today laying foam roadbed and nailing down track in The Channon (difficult) and Queenston (easy). This time the problem was with the line in The Channon that was parallel to the inner mainline loop. The problem was that it wasn't parallel. Once again, I had to remove a number of nails and then relay and modify the track placement to get it right. I also added my last two turnouts to provide an end-around capability in The Channon near the grain elevator. I am impressed with the flexibility that I have by adopting this method of nailing down the track - it is relatively easy to pull up a few nails, reposition the track, adding and removing sections of track, and then renailing the newly placed track. It is also a good argument for not ballasting the track, at least until one is absolutely sure that everything is where you want it.

Much to my surprise, I was able to use a lot of my scrap pieces of roadbed on the Coaldale classification yard. The final result was that I was able to complete laying and nailing down all of the track. A major job completed. I still need about a dozen under the rail magnets to finalize the layout but it is essentially complete now.

The next task will be to alter the wiring for DCC but that will have to wait until I am able to purchase a DCC system.

Realigned siding track in The Channon
End-around at far end in The Channon
Coaldale classification yard

I now can focus on the operational characteristics of my trains. I need to verify, once again, the coupler heights as well as the performance of the rolling stock on the track. There are bound to be a few problems: some with the track and some with the cars. We shall see.

SUMMARY of the session: I have now finished the track laying and am ready to focus on operational running of the trains.


Model Trains 07-05

January 6

Model Trains Index

8:30 PM While on the The Gauge model train forum this morning, it occurred to me that I should extract my Learning activities related to Model Trains from my Learning web site and create a new website that is totally dedicated to just my model train activities.

I have been working on this web site for about 6 hours - 2 of which was spent troubleshooting a bug with Dreamweaver. I finally decided to split my October files into two parts and that at least worked.

I still have a little bit of front end work in front of me as I create an Introduction page, but the basic task of copying the files and making minor formatting modifications so the links would work properly is complete.

The URL is: http://people.uleth.ca/~d.burnett/Trainsweb/Index.htm

SUMMARY of the session: I have now created a stand-alone web site dedicated to my model train activities.


Model Trains 07-06

January 11

Model Trains Notes

5:10 am Yesterday " I spent a couple of hours viewing websites of model train layouts. Some of these were incredibly impressive! It makes my efforts look like the amateur effort they actually are. At one point I was sufficiently chastened that I seriously thought of stopping what I was doing and beginning over. Then reason asserted itself, thankfully, and I decided that what I was doing was not that bad and that I still had a lot of Learning in front of me as I worked on wiring the layout for DCC and to then gain some experience with realistic operations. There will be lots of time in the future to think about a new layout. However I can take a few steps in that direction by doing more reading on layout planning and computer software for this."

I want to play with track layout possibilites a bit this morning.


First, I want to see what is available for Atlas sectional track, since that is what I am using. I have noticed a web site for the Layout Design Specil Interest Group (LDSIG) that I want to spend some time on. Next, I want to view a few personal web sites that use track layout software to show their particular system. I will begin this by seeing what I can find at The Gauge Forum.

1. Atlas

I didn't see any links on their web site for track planning software. However I did notice reference in their HO Forum to something called ProTrac. Now to google that and see what happens. "ProTrac model trains" failed to produce any useful hits.

I will try google again, this time with "Atlas track planning software". Bingo. The first hit was perfect: http://www.atlasrr.com/righttrack.htm . Much to my surprise, it is on the Atlas web site. The good news is that it is free. The bad news is that it is for PC only. Now to figure out how to download it on the Mac, copy the file to a memory stick, and then access it using Parallels (which is Windows xp mode). The first step is to register with the Atlas web site. Done. That was easy - I only had to provide an email address. Now to see what their email says. It gives instructions for downloading the file, which are very straigh forward. Done. I now have the zip file on my (Mac) desktop. Now to copy the file to a memory stick. Done. I am not sure if it is necessary to remove the memory stick before switching to Windows, but I will do that. Now to use Parallels and see if I can get this working [6:02 am]

[7:10 am] I am back in OS X. My trip to the dark side was a success. It only took 7 minutes to switch from OS X to Windows xp, locate the zip file, open the file, install the RTS software, and begin using it. Excellent. I was able to follow the tutorial and create a figure-8 track layout without any difficulty. I now want to see if I can locate any other examples of layouts using this software. Back to the Atlas web site. Nothing.

I tried google: "rts track layout" and found this site: http://www.layoutdepot.com/ . Now to have a look at it. Here is a page from this web site that focuses on RTS layouts: http://www.layoutdepot.com/designs.ihtml?step=2&sw=Atlas%20RTS&scale=HO

SUMMARY of the session: I found and went through the tutorial for the Atlas RTS (Right Track System) layout software. 7:55 am

10:00 am

2. LDSIG

Here is a web page on software:

http://ldsig.org/wiki/index.php/Drawing_Your_Layout_-_Manual_and_Software_Solutions#Using_a_computer_program_to_plan_your_layout

I have an early version of 3rd PlanIt. Now to see if I can find information on RR-Track. Success. http://www.rrtrack.com/index.html . I have just posted a message to The Gauge to see if I can get any feedback from existing users of this software. It certainly looks good from their web site.

10:55 am

11:20 am While having a shower it occurred to me that I should have tried a search on The Gauge using "RR-Track" as a keyword. I just tried it and found only 9 hits - suprisingly few. A couple of people like 3rd PlanIt, a couple like RR-Track and a couple like the Atlas Right Track System. The latter is free, a big selling point. The 3rd PlanIt comments acknowledge the steep Learning curve (which I would like to avoid). 11:40 am


Model Trains 07-07

January 12

Model Trains Notes


5:30 am I continued exploring the web for information on track planning.

I began the morning by looking at some of the posts on The Gauge Forum. I noticed one user who had a very attractive track plan in his post. A scroll through a series of his posts finally indicated that he was using a software package called XTrkCad.

I then used that term in a google search and located a web site that produced this software. It also indicated a Yahoo Group on this software, which I joined. Then I downloaded it from the Files submenu for the Group. Once again, the software was not available for Macintosh. I downloaded the file and then stored it on a memory stick. I then used Parallels to switch to Windows xp, copied the file to the desktop and installed the software.

I went through one of the introductory demos and it seems to work just fine. Given the price, I will stay with this for awhile and see if it meets my needs.

SUMMARY of the session: I now have a free software package for track planning that is worth trying for a few days.

7:10 am

9:40 PM By mid-afternoon I had changed my mind and decided to upgrade my version of 3rdPlanIt (from version 3.0 to version 7). I downloaded 6 program files as well as the user's manual. Since these were all Windows xp files, I then had to move them to Windows where Parallels could be used to load Windows and then install them. This took just over an hour to complete.

The manual was a different problem. I first had to download the latest version of Adobe Acrobat Reader (for Windows) and then open the pdf file. Once this was finished I had to transfer the file to another Dell computer that was connected to a laser printer. The final result was a printed version of the manual. Another hour. I am now ready to begin the tutorial (tomorrow).

SUMMARY of the session: I now plan to make a commitment to Learning to use 3rd PlanIt to prepare a complete set of files for my layout. I seem to be going about this in reverse: first I create the layout and then I create the plan. But the final result should be the same: a complete plan and a complete layout.

9:50 PM


Model Trains 07-08

January 13

Model Trains Notes


8:40 am This will describe my first session with 3rd PlanIt. There are a few wrinkles as I learn to use the Mac with Parallels (to provide a virtual Windows environment).

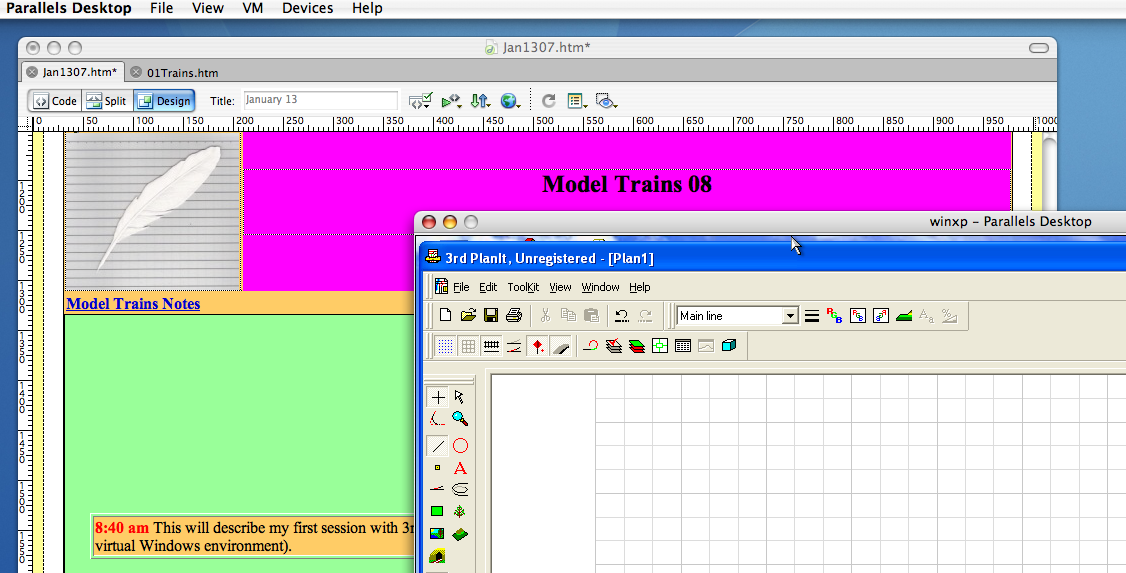
The first wrinkle is to learn how to switch between Mac OS X (which is where I create this web page) and Windows (which is where I use 3rd PlanIt).

Here is a screen capture of my OS X screen:

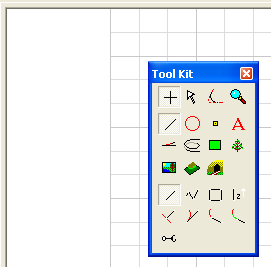
Basically I have two windows open: the OS X (which contains my Dreamweaver creation of this page) and a winxp window (which contains the display for 3rd PlanIt). When in OS X, I simply click anywhere on the winxp window to switch to that environment. When in winxp, I need to press the ctl-alt to switch to OS X.

To obtain a screen capture of a 3rd PlanIt display I must first be in OS X. Then I press cmd-shift-4 to activate the screen capture. I left-mouse-drag to select the area, which immediately creates a jpg file on the OS X desktop. I can then place this image on the Dreamweaver page by following the normal procedure for inserting an image.

The following section numbers refer to the numbers in the 3rd PlanIt User's Manual.

2.1.2 Floating the ToolKit

The ToolKit is initially located on the left side of the winxp window (you can see it in the above screen capture). By moving the cursor over the two lines at the top of the toolkit, one may drag it to any position on the screen. When one does this, it changes its shape:

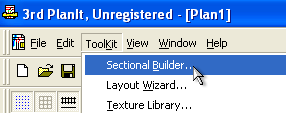
As soon as one selects one of the tools, the ToolKit disappears (which is a good thing as it clutters up the work area). When one is finished using the tool, a right mouse click will bring back the ToolKit. This is really neat!

2.2 A Sectional Track Plan

The goal for this section is to create a simple track layout using sectional track pieces.

Select ToolKit -> Sectional Builder:

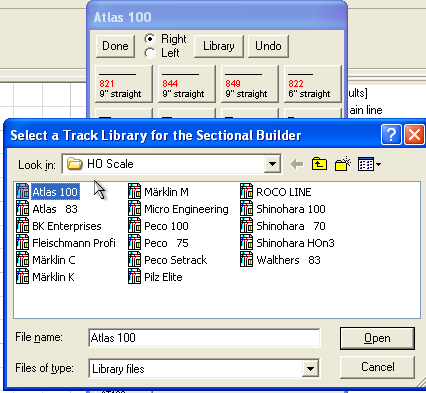
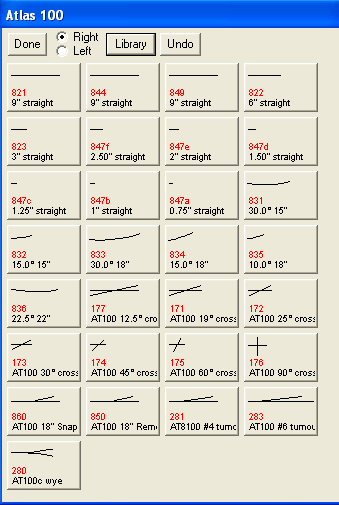
One can then select the particular the particular library one wants (in this case Track -> HO -> Atlas 100).

One then sees a display of all the items in this Library (i.e. all of the different track pieces made by Atlas for HO gauge 100).

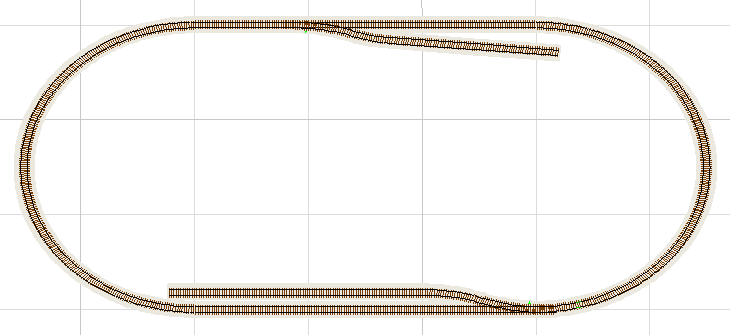
Laying track is a snap. Simply click on the pieces of track and each click will result in that piece being attached to the previous piece. Here is a simple example of an oval layout.

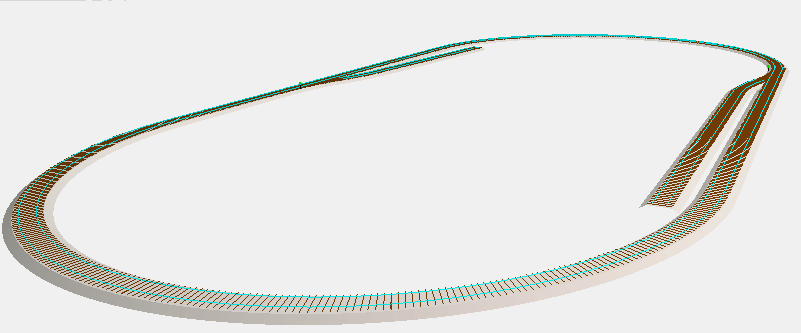
Success! My first layout.

2.2.2 Viewing in 3D

One can also view this layout in 3D. First, select all of the track objects. Then use the menu commands View -> 3D Origin and Camera -> Move 3D Origin To Center of Selection.

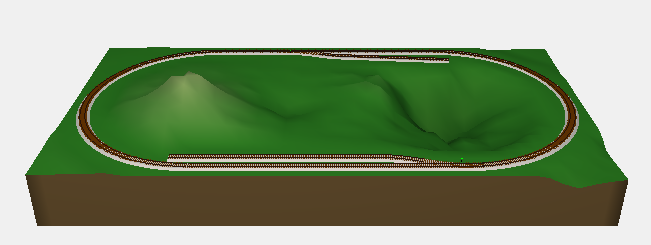
Slick! This will be more impressive when there is more to see.

2.2.3 Terrain

Switch back to 2D by pressing the Tab key. Click Done on the Sectional Builder to close it. Here is the result of applying a rectangular mesh terrain:

Once this is created it is relatively easy to alter the elevation of the terrain by pulling up or pushing down. Here is the result:

2.2.4 Modifying the Design

This will be my next session.

SUMMARY of the session: I am pleased with this session. The combination of using 3rd PlanIt as well as switching back and forth between OS X and windows xp while obtaining screen captures has been a challenge, but I seem to be getting the hang of it. 10:30 am

9:50 PM


Previous Month

Next Month