 |
6:40 am I have been sketching a couple of diagrams for potential model train layouts that avoid duck-unders and still maximize table area. This will involve taking off all of my buildings and track and starting over (again) but it is better to face this now than later.
My first impression is that I have a layout that will be much easier to run trains on and that will only involve a modest amount of rearranging. Now to see what I can find on the Web.
3:50 PM I have resolved to make a major adjustment to my model train layout. I know what I want to remove - the duck unders that will make it difficult to follow a train while it is operational, but I am not yet confident that I know what I want to replace it with. I have looked at a number of designs on the Web but do not yet have a clear image of the best approach for placing the underlying tables.
8:50 PM The train layout is finally taking shape. I now have a rough sketch of the table configuration with the mainlines drawn in. The layout conforms to the following design principles:
- All track is on a single level
- There are no duck-unders (this was the main reason I changed the layout)
- There are 2' aisles for the operator
- The mainline permits continuous running in a loop
- The basic design is a dogbone with additions
- There is a visual barrier separating the two towns
- There is only 1 entrance to Town 1
- There is ample time for the operator to meet the train after it passes through the visual barrier (this is an important consideration)
- The switching and yard layouts are still to be determined.
- The basic location of the coal mine, distillery, lumber mill and farms has been identified.
- The location of the buildings has yet to be determined.
There is much more work to be done. I will have to remove all of the existing buildings, most of the track, all of the wiring (!) and then re-arrange the tables and underlying structure. Then I have to put it all back together again: lay the track, redo the wiring and place the buildings.
9:00 am I need it to draw an accurate plan of my "new" track layout.
But before I do this, I need to slow down and make sure that I am comfortable with the ideas embedded in my sketch that I made last night. I have a printout from the St. Louis NRMA branch ( http://www.gatewaynmra.org/designops.htm ) that I want to reread and make a few notes on. In fact, the entire web site ( http://www.gatewaynmra.org/ ) is spectacular! There is much here I should read before proceeding with my plans.
Here are a number of points that I should keep in mind as I proceed. I will create a checklist for this.
Set layout up so it is operational quickly. Add details and enhancements over time.
- This means that I want at least one mainline loop operational first so I can run trains continuously.
- Looking at my sketch this means the track from the coal mine to Paradise Valley.
The final design should evolve through a combination of planning, practice and modification.
- This means getting the mainline operational first and running trains on it to see how easy it is to use.
Attach mainline track with thumb tacks and wire for conventional DC before switching to DCC "The primary goal in layout design is to create a railroad."
- This means aiming for realistic operation.
- All structures should satisfy the criterion of moving something from one place to another.
- Mainline operation should reflect real situations (e.g. passing sidings)
"The length of your passing sidings determines the length of the trains you can run."
- All 3 sidings can be fairly long. The shortest would be on the bookcase wall, which would be about 4' (about 8 cars).
"The number of passing sidings determines the number of simultaneous trains you can run on the mainline"
- I think I can have 3 passing sidings, one on each wall of the room.
No Duck-unders. The operator should be able to easily move around the layout. A scenic divider permits one to separate the different areas, giving a more realistic appearance.
- I plan to have one scenic divider separating the two towns (Paradise Valley and Coaldale)
- I think I will have a second scenic divider separating Paradise Valley into a farming district and a lumbering district, but I will wait until I have this set up before making a final decision.
Reaching distance should be less than 30"
- All tables are 24" wide.
Operator aisles should be at least 28" wide.
- My main aisles are 24" wide. I have one dead-end aisle of 16" that I have been using without difficulty. This is definitely something I want to test as soon as I have my tables set up.
Walk-around control is essential.
- I plan to use radio DCC throttles.
Place layout controls (e.g. turnouts) on the fascia near the portion of the layout they control The current trend is towards "eye-level" table heights (i.e. 52")
- My tables are built to a height of 40". This seems to me to give a nice balance between eye-level and a "birds-eye" view. It also allows me to see what is going on at the back of the layout.
Avoid long tunnels. One should be able to see part of the train at all times. Design to have a train running continuously. Design for single track use, not double track. "It is usually best to model one large terminal and let the rest of the layout act as a "staging" for trains arriving and leaving the terminal."
- My large terminal (Coaldale) will be the yard on the east wall. The town of Queenstown will act as a staging area for trains arriving from the yard.
"Yards are supposed to be operated, not to act as storage."
- My large terminal will be along the east wall. This is 2' wide and about 10' long which should give me plenty of space for a good switching yard. This will be where trains are created and sent out onto the mainline. It will have a station on the mainline (nearest the aisle).
"Real railroads try to make industrial trackage as simple as possible, so avoid the impulse to design a "switching puzzle" into your layout."
- I am not sure about this. I may put the John Allan "Timesaver" layout along the north wall where it doesn't interfere with anything and where it can provide hours of puzzle fun.
Give station names appropriate to what is being modeled.
- Since my layout is a freelance geographic area using 1950's era CN locomotives I can name my locations freely. Initially I have Coaldale, Queenston, Black Diamond and Paradise Valley. Each name has some personal significance for me.
"Name everything on the layout."
Coaldale (main terminal) Queenston (switching yard) Black Diamond (coal mine) Pine Ridge (lumber mill) Distillery Row (refinery) Paradise Valley (farming) The Channon (village) I need to do more reading on yard layouts Once the basic mainline is set, I need to think about what scenery can fit into this. At the same time I need to consider placement of buildings. Overall, I seem to be on track. The next step is to use EazyDraw to create a diagram of the proposed layout.
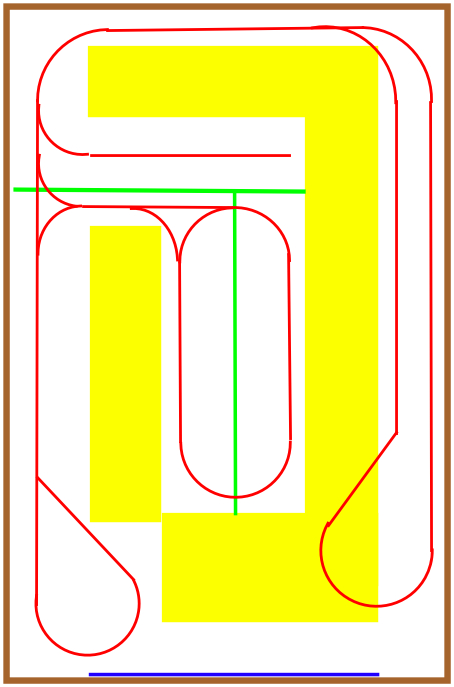
In the above diagram brown indicates the walls of the room, white the table surfaces for the layout, red the mainline track and yellow the walk-around aisles. There will be some rounding of the table corners. But this gives the basic idea. Coaldale will be the right hand side, Queenston the second horizontal line from the top, Black Diamond the bottom left corner,
4:30 PM This has been a busy afternoon. But the results are impressive, if one likes change and chaos. Here is a schematic diagram of what I hoped to accomplish.
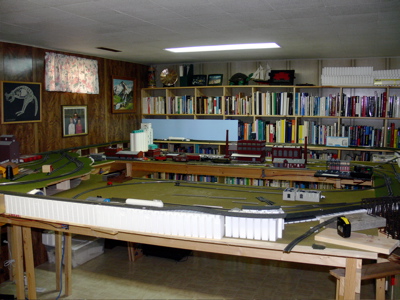
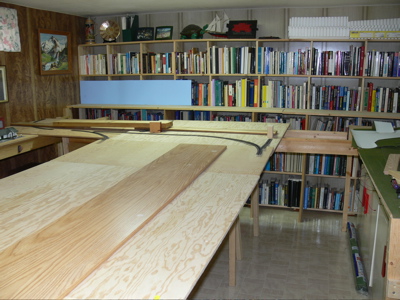
The first step was to remove all of the track, structures and wiring from the old layout. I was surprised that this only took about 2 hours. The next step was to rearrange some of the table tops and underlying framework to correspond with the above diagram. This took about an hour.
But then the fun began. The loop in the bottom right corner of the diagram simply did not fit in the available space (the diameter of a loop is 44"). I tried a totally different arrangement of the tables but was dissatisfied with the result. The breakthrough came when I realized that I didn't need a loop on the right side. The will be the main terminal yard which will work just fine as a one entrance yard. Trains will pull into the yard from the top, then the train will be disassembled and reassembled, and then it will leave by the same track it arrived on. Simple.
I then placed a couple of temporary boards to simulate the visual barriers to give myself a sense of what it might look like. I am pleased with it so far. I have added a small section of track from the top right corner of the oval loop that will go through the visual barrier and then into the town ( Queenston) from the right. Thus I will be able to enter and leave the town from either end.
I still have a fair amount of construction work to get the table tops and framework cut to size and fastened properly. Once that is done, I anticipate a fairly short time to lay the mainline track.
Here are a few images of the situation at the moment.
I have mentally run a number of imaginary trains on this layout and it looks like it will be a genuine improvement over the earlier layout. Once again, the critical difference is that I can now walk all around the layout without having to duck-under any of the tables. The addition of visual barriers is a new idea for me, but I think it will work rather well.
I am quite excited about the improvements and am eager to get the "ground prepared" so I can begin laying track.
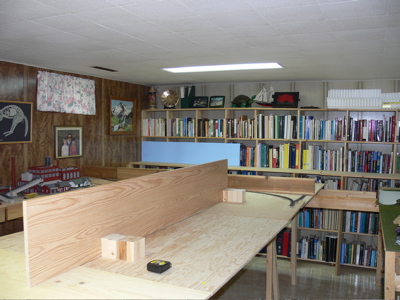
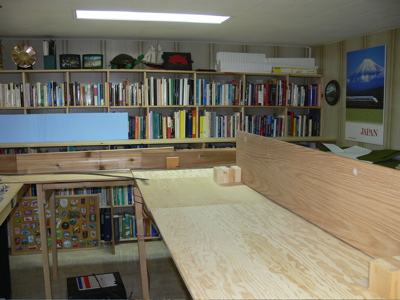
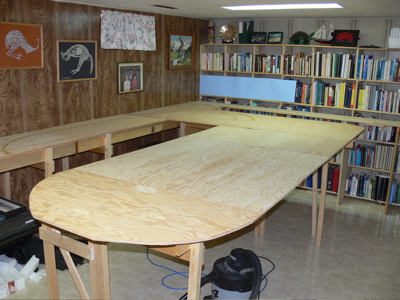
8:00 PM I have finished building and joining together the tables for my planned layout.
Here are a few images of the situation at the moment.
So far, all is well.