 |
July 4, 2006 9:45 PM I am back from my first meeting with the people at the Lethbridge Model Train Club. Here are a few points that I made note of:
- go slow
- it might be a good idea to start with 2 terminal track sections on the lower mainline and see how this goes. Then add a few more as I get more comfortable with this.
- begin by tacking down the track and test this for awhile
- try running a train on the mainline and get used to switching to the sidings.
- focus on running one train well. Don't worry about running more than one locomotive at a time until much later
- do more reading about using DCC to control switches. This may be too much of a power drain or too expensive.
- It may make sense to control all switches with a control panel and use DCC for the trains. I could then have a control panel for each yard or siding. I want to think more about this and look for additional information on using DCC to control turnouts.
- buy an NRMA gauge the next time I am in Calgary. See what they say about terminal strips.
Now that I am home, I can google a few sites.
Here is a very useful web site for wiring: http://www.wiringfordcc.com/track.htm#a7
Here is a web ring for DCC: http://n.webring.com/hub?ring=modelrailroading
Here is the site for NCE DCC systems: http://www.ncedcc.com/ncetest/nce2.htm
Here is the site for MRC DCC systems: http://www.modelrectifier.com/
I really want to read as much as I can about terminal strips.
I want to be crystal clear in my own mind about exactly what my wiring will look like.
10:40 PM
July 10, 2006 4:30 PM At the moment I have been thinking about how I will actually be operating this layout. I envisage two primary control panels, one for the lower level mainline and the second for the upper level mainline. The lower level will have 2 additional secondary control panels for the two switching areas (very tentatively called A & B). The upper level will have 4 additional control panels (C, D, E & F). I have placed small 2x4 cards to indicate where these will be located (i.e. the secondary control panels will overlook the switching areas they control) and two 3x5 cards that will indicate where the mainline control panels are located. These control panels will operate the turnouts. The turnouts on the lower level will be numbered from 1 to 11 for the mainline and 20 to 49 for all the secondary areas. The turnouts on the upper level will be numbered from 50 to 63 for the mainline and 64 to 99 for the secondary areas.
Now that the overall control operation is specified, I can begin to do the wiring for both motive power and turnout control.
The trains will be controlled by DCC.
The next step will be to tack down the lower mainline track and attach a few terminal tracks for the motive power. Then I will begin wiring the turnouts and verifying that the overall system works as I envisage it.
I am quite pleased with the conceptual progress I have made this afternoon.
5:00 PM
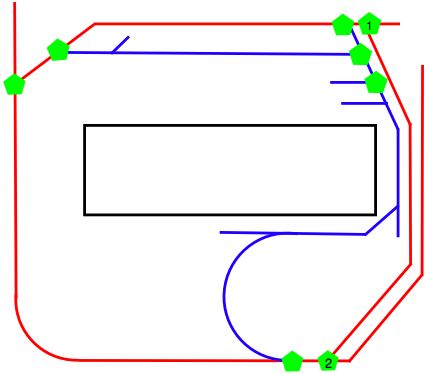
July 12, 2006 2:45 PM I have been playing with the EazyDraw software and it looks like it will meet my needs. It was very easy to save a copy of the file as a JPEG file and insert it into this web page. Here is a partially completed diagram of the Lower Mainline track structure:
The reason the diagram is incomplete is that the preview copy has a restriction on the number of elements that one can include in one file. The overall white area represents the table top area for the layout, which will consist of track and adjacent buildings and scenery. The red line indicates the mainline track circuit. The vertical line on the left side is the track that connects to the Upper Mainline layout. The blue line indicates a 'reversing loop' which is also part of the mainline track circuit. The green pentagons indicate turnouts (i.e. switches). The only turnouts on this diagram are those on the mainline (there are 11 altogether, with 4 presently unmarked on the diagram). The short track sections that join up to the mainline may represent a complex set of siding tracks and these will have their own control diagram and panel. The black rectangle in the center is an area that one may walk around in. I also want to add some additional labels indicating the nature of the some of the white sub-areas.
I plan to attach this diagram (when it is completed) beside a power pack (initially a variable DC current, but later a DCC current) and a set of turnout controls. I will use Atlas turnout controls since they came with the turnouts. Each turnout control (11 in all) will have 3 wires connecting the control to the actual turnout. This wiring will remain the same whether I use DC or DCC. This control panel will be placed in the top right corner of the walking area (i.e. black rectangle).
I have placed 3 terminal track sections (these are special pieces of track that have connecting screws for attaching the wire carrying the current to the track) on the layout, one near the control panel on the red section and one on the opposite side of the layout (near turnout #4 if you keep counting the green shapes beginning with 1, 2 and so on. The third terminal track is on the reversing loop section (blue line) near the control panel. I will mark these on the diagram later as well. A terminal strip with 8 connecting screws should (if I understand how these terminal strips work) allow me to have two wires from the power pack attach to two connecting screws and a pair of wires from each of the remaining 6 connecting screws will go to the 3 terminal track pieces. One should get a sense of how important it is to plan for the wiring before actual beginning to do it. Much to my surprise, I have one of these terminal strips with 8 connecting screws so I will be able to test this out.
The next step will be to tack down the lower mainline track and verify that I can run a locomotive on it. This will proceed in two phases. The first phase will be verify that the red circuit works and that a locomotive will run successfully on it. The second phase will be to tack down the track for the 'reversing loop' (blue line) and verify that this also will run a locomotive. There is some special considerations when wiring the blue section to ensure that one doesn't end up with a short circuit but I think I understand how this works and do not foresee any difficulties. Then I will begin wiring the turnouts and verifying that the overall system works as I envisage it.
At this point I will have two equally valid choices for my next step:
- repeat this process for the Upper Mainline circuit
- complete laying track and turnouts for some of the switching areas on the Lower level.
Then, and not before I can consider rewiring the mainline for DCC. However there is no point doing this until I have a DCC ready locomotive!
Once again, I have a real feeling of progress. I seem to know what I am doing and have the sequencing under control. However each actual step needs to be taken slowly and very carefully. I now need to pay particular attention to the laying of the track and ensuring that each individual piece is very carefully placed and mounted.
3:40 PM
6:30 PM I have just tried connecting two wires from the power transformer to the terminal strip and then two more wires from the terminal strip to a terminal track section. Nothing. I then tried a few combinations of hookup and discovered that the terminal does not work the way I thought. Each terminal is insulated from the other terminals. It makes sense when I think about it, but that means that there is no point in using it as I will need to connect the wires to each terminal post.
July 13, 2006 7:30 am Before beginning work on laying track on my layout, I want to highlight a few points on the topic from "Trackwork and Lineside Detail for Your Model Railroad" by Kent Johnson. These are taken from the first chapter "Flexible Trackwork" by Jim Hediger.
- "Building reliable model railroad track doesn't take a lot of expertise or fancy tools, but it does require care and patience." [p. 4]
This is worth remembering. Slow. Slow. Slow.
- "... most modelers choose flextrack when they begin building a permanent layout." [p. 4]
I should give more attention to this. This would reduce the number of connections and improve overall conductivity and performance. This is particularly important on the mainline where most of the movement occurs.
- "... it's best to fit the track components together first and then mark the appropriate center lines between the ties. Then lay the roadbed." [p. 5]
I am doing this. I need to identify major sections and ensure that all the track is exactly where I want it in a section before I glue the roadbed to the table surface.
- "Start at a group of switches or a crossing where several different track alignments come together and then work out in all directions..." [p. 5]
- "As you join the track sections, lean down and sight along the rails to check the alignment at the joints." [p. 5]
I think it also makes sense to use a strait edge to check the alignment.
- "Test-fit each track section and trim it to fit. ... Cutting leaves a small burr that interferes with the rail joiner slipping on easily. Smooth the cut rail ends with a file before you add the joiners." [p. 5]
Before glueing down the roadbed I should also check to see if I want to insert any uncoupling magnets on the roadbed. This is not likely on the mainline track but is essential on the sidings and switching yards. Here is another quote from the third chapter "Railroading Without Derailments", also by Jim Hediger.
- "The key is to maintain good alignment through the rail joints. You need a smooth path for the wheels to follow, so make sure the tops and inside faces match perfectly." [p. 7]
8:10 am
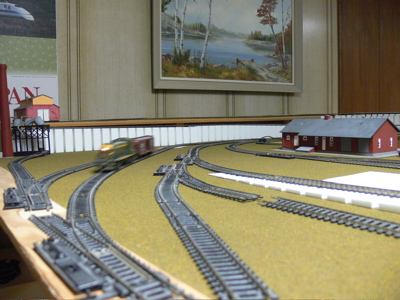
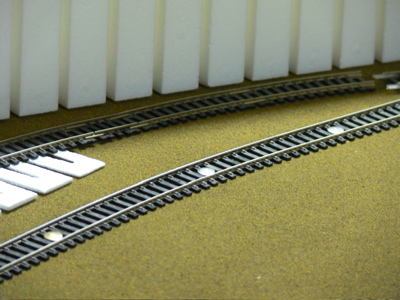
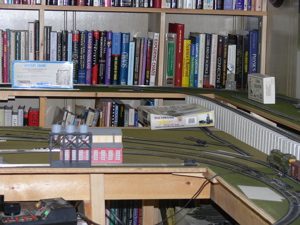
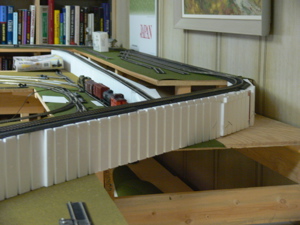
12:20 PM I have tentatively tacked down the Lower mainline track. I replaced much of the sectional track with 3' lengths of flexitrack. I was impressed at how much more gradual, and realistic, I could make the curves. I now have a little cutting to do to bring the two tracks back to the same length at the end (since the inner track on a curve uses less length than the outer track). This is also the first time I used tacks to fasten the track. Paul mentioned this trick at the Lethbridge Model Train Society meeting a couple of weeks ago. At the moment I am using brightly colored plastic tacks which make it very easy to see which track is the mainline. Now I want to see if I can find some regular thumb tacks and see if I can run a locomotive over them. That would make it possible to really test the track before committing to the positioning. Once again, I am pleased with the result so far. This took about an hour to complete.
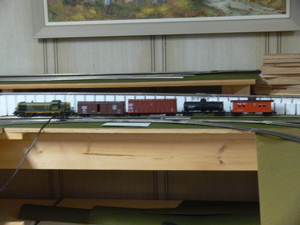
7:50 PM I have been down playing with the layout for the last hour. I finally located some thumb tacks and exchanged these for the plastic tacks I had been using to fasten the track to the plywood. It worked like a charm. I cut one piece of curved flextrack and then hooked everything together and added the power. The locomotive ran around the Lower Mainline loop like a charm. Perfect. After watching it for about 15 minutes I finally shut everything down and came upstairs to complete this report.
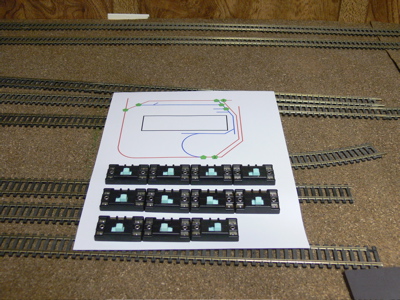
Here are a few photos:
I originally thought that I would immediately continue with making the Lower Mainline track layout permanent, but I now think I will run trains on it for a few days and see if any problems emerge. However I might work on the reversing loop section of the Lower Mainline and see if I can get that working. Another option will be add another half dozen to a dozen cars to the train consist and see how it behaves. A third option is to work a bit on some of the structures. And a fourth option is to begin wiring the 11 turnouts on the Lower mainline. But before I do this latter option I want to review the status of the turnouts and see if some of them can be replaced with an under the table mechanism.
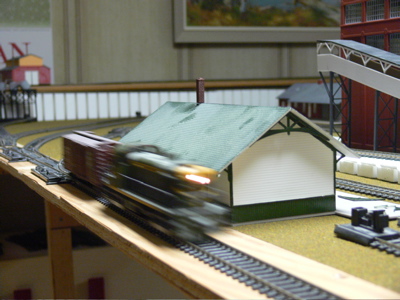
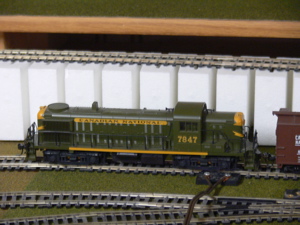
July 14, 2006 8:55 am I began the day by replacing one section of Flextrack to correct a problem with a gap between two sections. I then dusted off the locomotive (CN 7847, an RS-3 diesel) and 4 rolling stock:
- CN 501417, a 40' boxcar
- CN500899, a 40' wood boxcar
- GATX 22691, a 36' tank car
- CN 78213, a caboose.
The train ran smoothly around the Lower Mainline track. I noticed that the caboose was missing a smokestack, so that means the crew will not be able to have coffee. It is genuinely satisfying to actually have a train moving on the layout again.
I tried updating one of my databases to indicate that the above 5 units were now operational, but I do not have the appropriate software installed on my computer. Hopefully I will get this fixed up in the next few days.
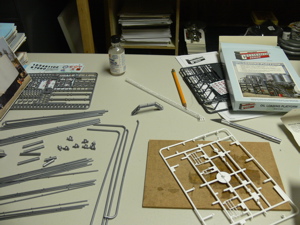
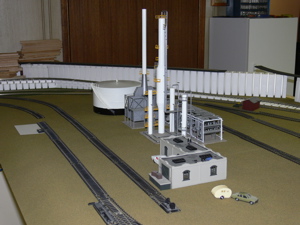
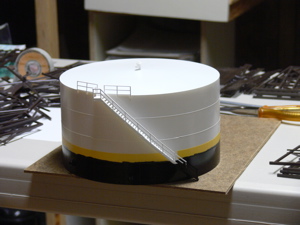
2:00 PM I bought a small folding table at Costco and now have a place where I can work on my models. I have opened a kit for making the piping that surrounds a oil tank facility and have begun assembling it. It has been about 5 years since I last did this. One of the advantages of working on these kits is that it gives some variety to the tasks surrounding the model train hobby. This variety now includes wiring, making scenery, learning about DCC, making buildings, reading about history of CN trains, and actually operating the trains and turnouts.
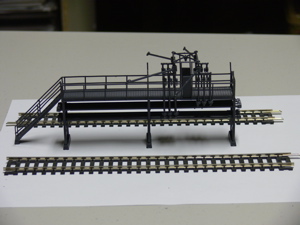
9:40 am I have been working on two different Walthers Cornerstone Series model kits for the last 3 hours. How time flies when one is having fun. I began with kit #933-3105 Piping Kit which "represent the piping found in refineries, bulk fuel terminals, chemical complexes, and loading/unloading facilities." I have assembled the walk ways as well as attaching the turning wheels to the valves, and have removed all of the pipes from the sprues. However I will wait until I have the complete refinery, oil storage tanks, and tank car loading platform kits completed before placing them all together on a small platform. This will allow me to see where I need to place the earthen berms around the storage tanks and then where to place the piping so that it all joins together into a coherent whole. The piping should be painted silver. I noticed that the sprues that hold the pieces together when the kit is new also make for some good piping.
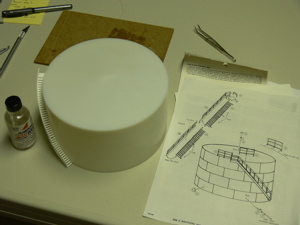
I then began work on kit #933-3120 Oil Storage Tank. I built one of these many years ago, but I had a second one which I had yet to open until this morning. Although there are not very many parts in this kit, the actual construction is quite difficult as one needs to bend a spiral staircase up the side of the tank.
I also have a third kit, #933-3104 Tank Car Loading Platform, which I need to assemble. This will complete my oil refinery complex by providing a facility for loading my railway tank cars with the products from the oil refinery. I now need to keep my eyes open for some additional feaatures that will make the layout more realistic (e.g. people, vehicles, trees, shrubs, earthen berms, lawns, offices, oil barrels, wooden pallets). I should have a look at my magazines and see if there are some suggestions or ideas that I might be able to use with this scene.
The center-piece for this is the oil refinery which I completed a few years ago. So the hard work is behind me. But this will be the first time I have tried to tie together a number of kits into one overall scene.
2:00 PM I am back from a quick trip to the local model train shop. I ended up buying:
- 1 can Testors spray enamel (Gloss White) - I will need this when I paint the oil storage tank.
- 1 small jar Tamiya acrylic (Black) - I will need this when I paint the oil storage tank [Looking at the jar now, I don't see where it says it is a glossy finish. I had better test this first!
- Tamiya masking tape. I did not realize they made masking tape for modelers. This should help me make a straight line between the white and black sections of the oil storage tank.
- 1 Bright Boy track eraser. I need one of these to clean my track. The one I have is well worn.
- 1 Life-Like Trains Scenic Master "People Standing" set of 6 figures
- 1 Life-Like Trains Scenic Master "People Walking" set of 7 figures
- 1 Life-Like Trains Scenic Master "Tractors" set of 3 old style red tractors
- 1 Life-Like Trains Scenic Master "Stake Trucks" set of 2 old style farm trucks.
I will put all of these latter 4 sets of figures/vehicles on the layout immediately.
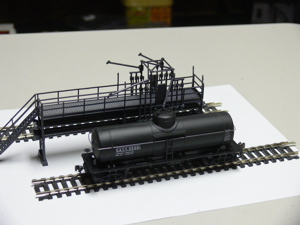
I have made good progress with my oil refinery models. I have finished assembling the oil storage tank and have applied the first coat of paint to it. I will add a second coat after dinner. I am now working on the Oil Loading Platform kit.
5:10 PM I have finished assembling the oil Oil Loading Platform kit. This kit had a large number of very small parts and I had to be very careful to follow the steps exactly.
I am still painting the Oil Tank but the assembly is complete. The final step will be to assemble all 4 structures (2 oil tanks, 1 refinery and 1 oil platform) into an integrated whole with earthen burms around the tanks and pipes connecting everything so the oil can flow. This is best done by putting everything on a single base sheet and then working on the ground cover. Creating a complete diorama will be a new experience for me.
10:00 am I went downstairs this morning to review the layout and see if I could identify a couple of small scale tasks that need to be done soon. I decided to open a cupboard door that contained some model kits that I had bought a few years ago ( 5 - 10 years) and had never gotten around to building.
The first surprise was to see a second Oil Loading platform kit. These are designed to fit together if one wanted a larger loading facility. I now have to decide whether to do this or place the second platform somewhere else. The latter would seem to make the most sense as I do need a place to unload the tanker cars.
I then decided to see if there were any other surprises. Not really. But I did have a few kits such as a grain elevator, a grain storage bin and a train station that I had forgotten about. I also noticed that I had 3 bridges, 2 or which were similar to the Lethbridge coulee bridge. The challenge is to see if I can find a way to integrate these into the present layout.
That took a couple of cups of coffee but I think I have a solution. It will not involve any real changes to the existing layout but it will require a substantial addition to one end of the layout as I play with the idea of running a loop into the furnace room. This would entail a narrow ledge along one wall of the furnace room and an adjustment to some unused shelves which could then be used as an "out of sight" yard where a number of rolling stock cars could be stored. I should also be able to build another smaller table area in the same place where I hope to put the book boxes I will make shortly. This table area would then become another small town which could hold the train station and a couple of other industrial buildings.
But the really exciting idea will be a table structure at a much lower level that would be the base for a "high level" bridge of about 40" in length that would (easily) swing out of the way when the trains were not being used. This overall plan should keep me busy until Christmas!
However the main priority remains that of getting the original two level mainline tracks operational. Hopefully the upcoming trip to Edmonton will answer a few questions and I can then proceed with the next steps in wiring the layout.
8:10 PM I visited the Lumber yard this morning to buy a sheet of masonite for backing for my book boxes. I discovered that they also had a masonite that was finished white on the smooth side -exactly what I wanted for the book boxes. I am hoping that there will be a piece left over that will be suitable for a base for the oil refinery diorama.
I then visited the Model Baron Hobbies shop where I bought 3 small jars of paint:
- Tamiya XF-16 Flat Aluminum ($2.99) - I hope to use this for the piping on the refinery diorama
- Poly Scale F414329 Railroad Tie Brown ($5.99)
- Poly Scale F404079 Oxide Red ($3.99) - I hope to mix these two paints to get a color I like for the wooden trestle kit
- Testors 1260 Dullcote Spray Lacquer - This will be used to remove the sheen on some of my plastic models.
I also noticed that Tamiya X-1 Black is a gloss paint. I bought this a couple of weeks ago for the bottom of the oil tank but was afraid to use it as the jar didn't indicate that it was a gloss paint. I decided that I could now try this later today.
When I last was involved in this hobby the brand name for paint for model railroaders was called Floquil. It is now called Poly Scale, but is the same company.
I have just finished painted the bottom of the oil tank with Tamiya X-1 Black. I first applied some Tamiya masking tape to provide a straight edge for the black paint. The paint is definitely black and glossy. I will wait until tomorrow to remove the yellow tape and see if it worked. This was my first use of masking tape while painting a model. Each day I learn something new.
When I was finished I realized that I didn't have any solvent for cleaning the brush. It is going to take a while before I have my hobby habits.
5:20 PM This has been a very relaxing day. I spent about 2 hours this morning thinking about the wiring for the Lower Mainline track and another couple of hours this afternoon assembling part of the wooden trestle kit. It is genuinely therapeutic losing oneself in a hobby (not that I need therapy!). It has been years since I have done that.
As I am fairly new to the entire idea of wiring a model train layout, this morning ended up being devoted to clarifying exactly what I intend to do. Upon finally developing a clear idea of exactly what wires would go where and how they would be attached to each other I realized that I would have to buy some more wire and terminal strips before actually beginning.
I think it is very important to get this right the first time. The first step was to realize that I needed about 50' of red 14 gauge wire to pair with the 50' of black 14 gauge wire that I purchased a couple of weeks ago. This will enable me to follow the NRMA standard of using red wire for the right rail (mnemonic: red and right both begin with the letter "r") and black wire for the left rail. I assume right and left is determined with the overall layout in front of one and then treating the main loop as going in a clockwise direction.
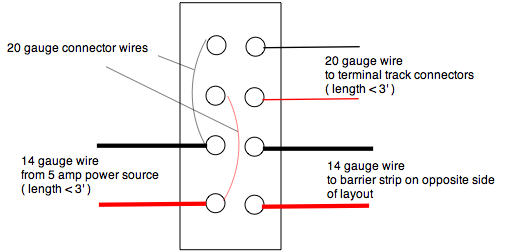
The next problem is to be clear about how to wire a terminal strip. This depends on how many power blocks I will have in a power district. I plan to have 2 power districts: one for the Lower Level and one for the Upper level. The Lower Level Power District will have 2 power blocks: one for the Lower Mainline loop and associated sidings and the other for the Lower Mainline Reversing loop and associated sidings.
My immediate task is to wire the Lower Mainline loop. I will begin with 2 terminal tracks at opposite sides of the loop. I want to then test this and see if there is any noticeable loss of power at any stage of the loop. I will then place a 4-position dual row barrier strip near the terminal track that is close to the control panel. This will be mounted below the layout on the supporting table structure. The second 4-position dual row barrier strip will be mounted in a similar fashion near the second terminal track on the opposite side of the layout.
I will use a short piece of red & black 14 gauge wire to connect the power source to the first barrier strip. Then on the other row of the barrier strip I will have one pair of short red & black 20 gauge wire connecting the barrier strip to the terminal track. Then I will have another pair of red & black 14 gauge wire connecting this barrier strip to the second barrier strip on the other side of the layout. This wire will loosely follow the route of the Lower Mainline track. At this second barrier strip I will have a short pair of red & black 20 gauge wires connecting to the terminal track.
Here is a diagram of the wiring for the first 4-position barrier strip:
I will also need some red and black 20 gauge wire. I think 50' should be enough for awhile. I will also need some additional (say 6) 4-position dual row barrier strip.
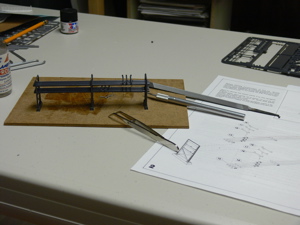
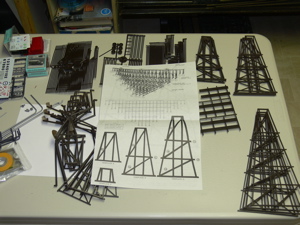
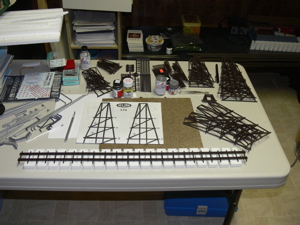
In the afternoon I began assembling the wooden trestle kit. I have now put together all 20 vertical support structures as well as the track bed. The next step will be to assemble these structures into the final structure. Once I have completed the structure, I think I will spray it with dullcote to remove the plastic shine but keep the dark brown color.