|
|
6:20 am
Here are the notes I made to myself early this morning. |
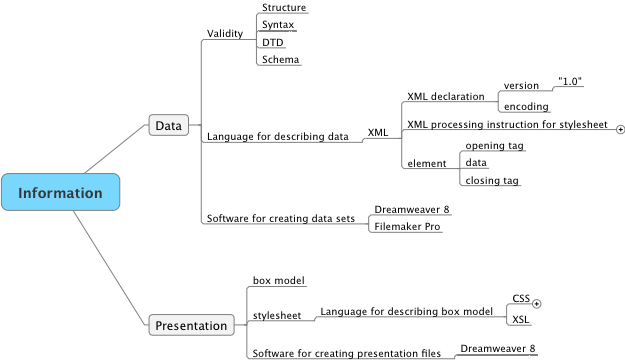
Here is a conceptual map of the overall situation for displaying information on various devices such as computer screens that are connected to the Web:
I believe that it is critically important to have a clear idea of what one is trying to accomplish and of how one should actually accomplish it using the tools that are available.
I am trying to create displays for use by Web browsers such as Microsoft Internet Explorer, Firefox and Safari. This is accomplished by creating two files: a data file and a presentation file. The data file contains the actual text and images that are to be displayed and the presentation file contains the instructions that direct the browser how to organize and display this information. The data file uses a set of rules called XML (sometimes a subset of XML called XHTML) and the presentation file (called a stylesheet) uses either CSS or XSL as the rules for writing the instructions that are used by the browser. All of this may be done using one tool - Dreamweaver 8.
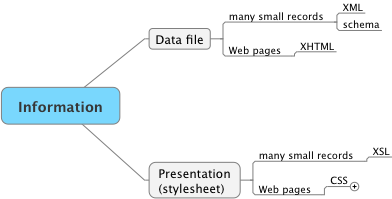
Here is another diagram that shows this overview:
6:30 am
When I retired I indicated that I might like to teach a web authoring course in the future that utilized an XML/CSS approach. I felt at the time that the courses which I had developed using a table approach were rapidly becoming outdated. I am now ready to revise those courses if I should decide to try teaching them again.
|
|
|
|
3:20 PM
I want to begin making notes for "Cascading Style Sheets - The Designer's Edge" by Molly E. Holzschlag.
I will try for a chapter a day. |
The book contains 9 chapters.
"To learn and use CSS effectively, you must have an understanding of the underlying technical structure of both web markup and CSS itself." [p. 1]
| I agree. This is the conceptual (i.e. theory) part of the topic and it forms the foundation for the technical (i.e. Dreamweaver) steps. The first step is to understand what one wants to do, then one needs to learn how to do it. |
Chapter One Understanding Structured Markup [p. 3 - 29]
One of the early HTML tags was that for data tables. Great. But then someone realized that if you turned off the borders you had a system for designing a page layout. But tables were not intended for this use and this has led to difficulties when the tables become complex and heavily nested. Different browsers may also interpret such complex code in different ways resulting in different views for the user. There is now a general feeling that the field should re-evaluate its procedures and establish a set of standards that will lead to a greater uniformity of results without compromising innovation and creavity. This new set of standards is known as XHTML.
The principal idea of XHTML is to separate document structure and style.
This page conforms to XHTML 1.0 transitional.
The first line of code is:
<!DOCTYPE html PUBLIC "-//W3C//DTD XHTML 1.0 Transitional//EN" "http://www.w3.org/TR/xhtml1/DTD/xhtml1-transitional.dtd">
|
The book mentions the following website as one which focuses on the educational aspects of W3C's recommendations: http://www.webstandards.org/
| There is a lovely debate at this website (see "On Quality Education" by Holly Marie Koltz) ( http://www.webstandards.org/2006/05/24/on-quality-education/ ) on the current situation of Web design courses which are often "table-based" rather than CSS based. I am determined to make sure that all of my work from this day forward involves using CSS. |
Document structure involves:
- A DOCTYPE declaration
- An html element (the root element)
- A head element with a title element
- A body element
- Structural elements
- h1, h2, h3, h4, h5, h6
- p, br
- ul, ol, dl, li
- div
- table, tr, td
Document presentation involves:
- color
- text formatting
- background graphics
- borders, padding, spacing
- layout of pages
At its most strict, HTML 4 suggests that the author leave tables behind as a means of presenting layut and instead us Cascading Style Sheets for the positioning of objects on a page.
| This page currently is a blend of CSS and tables. Tables are used both for the overall layout as well as for some genuine tables (e.g. the planning tables). These notes are currently set up as a table. I have some work in front of me. |
There are 3 types of Document Type Definitions:
- Strict
- Transitional
- Frameset
Browsers now require a Document Type Definition in order for them to determine how they will interpret the following code. A strict DTD does not allow hardly any presentational elements. A transitional DTD does allow a number of presentational elements but also encourages one to move away from these.
"With XHTML 1.1, the concept of separation of structure and presentation is complete. XHTML 1.1 has only one public DTD, based on the Strict DTD in XHTML 1. Web authors also have the option to work with modularization.
Modularization breaks HTML down into discrete modules such as text, images, tables, frames, forms and so forth." [p. 17]
"XHTML is much more rigorous than HTML and demands close attention to details." [p. 17]
- It is recommended but not required that an XHTML 1 document be declared as an XML document using an XML declaration.
- It is required that an XHTML 1 document contain a DOCTYPE that denotes that it is an XHTML 1 document and also denotes the DTD being used by that document
- An XHTML document has a root element of html. The opening tag of the html element should contain the XML namespace xmlns and the appropriate value for the namespace.
Here is the code that is generated automatically by Dreamweaver when creating a new basic page using XHTML 1.0 transitional.
<!DOCTYPE html PUBLIC "-//W3C//DTD XHTML 1.0 Transitional//EN" "http://www.w3.org/TR/xhtml1/DTD/xhtml1-transitional.dtd">
<html xmlns="http://www.w3.org/1999/xhtml">
<head>
<meta http-equiv="Content-Type" content="text/html; charset=ISO-8859-1" />
<title>Untitled Document</title>
</head>
<body>
</body>
</html>
Here is the code that is generated automatically by Dreamweaver when creating a new basic page using XHTML 1.0 strict:
<!DOCTYPE html PUBLIC "-//W3C//DTD XHTML 1.0 Strict//EN" "http://www.w3.org/TR/xhtml1/DTD/xhtml1-strict.dtd">
<html xmlns="http://www.w3.org/1999/xhtml">
<head>
<meta http-equiv="Content-Type" content="text/html; charset=ISO-8859-1" />
<title>Untitled Document</title>
</head>
<body>
</body>
</html>
Three important syntactic rules for XHTML are
- that the elements be nested properly,
- that every tag have a closing tag,
- and that all values of attributes appear in quotes.
5:00 PM
This has been a very enjoyable 2 hours. I can honestly say that I understood the material. It was a good review.
I still do not know how to create a document that displays the material the way I might envisage it, but I do have a good understanding of the principles that I will be following when I do it. |
|
|
|
7:00 PM
After another frustrating hour I have decided to revert back to using tables to prepare this insert. There may be a way to achieve the same goal using CSS but so far I have not been able to see it.
This page is still valid using the W3C validity check service.
|
|
|
Technology Notes |
6:05 am I want to step back from CSS for a moment and refresh my mind about the big picture of XML and stylesheets. |
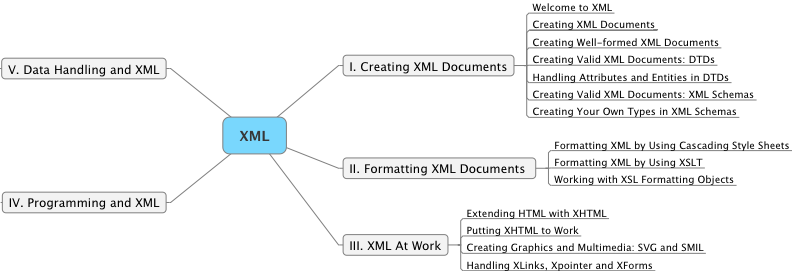
Part I Creating XML Documents
Chapter 1 Welcome to XML
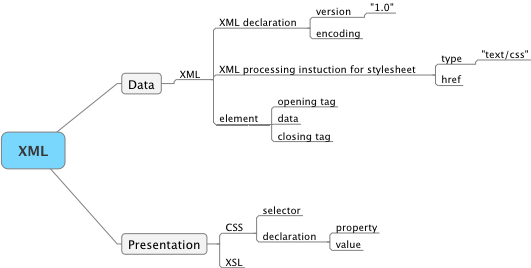
Here is a schematic image of what I have covered so far:
Chapter 2 Creating XML Documents
SUMMARY of the session:
12:30 PM This was a great session. I have on the screen, and the book, for 3 hours. This time through, it all made sense. Great. Making these notes acts as a good way for reviewing the material. The important point is that it all makes sense. |
|
|
|
Technology Notes |
9:05 am I want to step back from CSS for a moment and refresh my mind about the big picture of XML and stylesheets. |
Here is a mind map of "SAMS Teach Yourself XML in 21 days" by Steven Holzner.
The last two sections do not appear useful to me, at least at the moment. There are two main dimensions to the topic: conceptual and software-dependent (i.e. Dreamweaver). That is, I need to understand what I am trying to do (which involves a large number of new concepts and terms) and then I need to learn how to accomplish the task using Dreamweaver. Unfortunately the book only discusses the first topic. Let's see how it goes by making a few notes on the first few chapters.
There is a neat option for downloading all of the code examples used in the book. The steps for doing this were easy to follow and I now have a file folder containing all of the examples. A promising start.
Part I Creating XML Documents
Well-formed documents obey a number of rules. To be valid, an XML document must specify a set of syntax rules, and XML processors can use these rules to check whether that document adheres to those rules. There are 2 ways of specifying the syntax of XML documents: by using document type declarations (DTDs) and XML schemas.
Chapter 1 Welcome to XML
"XML is all about storing your data. ... XML is not about displaying your data - it's about packaging that data to transport it easily." [p. 10]
"... the languages designed to let you store and handle text are called markup languages, and there are plenty of them out there." [p. 10]
One example of a markup language is HTML. The markup tells the browser how to interpret the data. The markup is made up of tags such as <HEAD>, <BODY>. However HTML is a very limited language and is no longer recommended for use in creating web pages. The real difficulty is creating a language that has enough tags to do the numerous different activities that one might want to do. The whole idea behind XML is to let you create your own markup.
"XML is meant for storing data, not displaying it." [p. 12]
"XML is a creation of the World Wide Web Consortium (W3C). ... XML version 1.0 is in recommendation form, and has been since October 6, 2000, which means its an established standard." [p. 13]
I have just checked the W3C web site ( www.w3.org ) and noted that XML version 1.1 is now in recommendation form since August 16, 2006. |
All XML documents begin an XML declaration that specifies which version of XML is used in the rest of the document.
Using Dreamweaver, if one creates a new XML document, the first line of code is automatically created:
<?xml version="1.0" encoding="ISO-8859-1"?>
I will try changing this to version 1.1 when I have a good example in hand and see if it makes any difference.
|
Now that I have a line of code, it is time to look at the syntax.
<?xml?> is called a declaration (it declares which version of xml is being used) and has 2 attributes, version and encoding. Each attribute is given a value by using an equal symbol and then enclosing the value in double quotes.
An element is the fundamental unit that you use to hold your data. Elements always start with an opening tag and end with a closing tag. You create an element by pairing an opening tag with a closing tag. (e.g. <stuff>...</stuff>).
"You're free to make up your own element names in XML, and that's XML's whole power - the capability to create your own markup." [p. 15]
I just tried previewing the following XML file in both Firefox 2.0 and Safari 2.0.4. Safari worked fine, but Firefox gave an error message on xml version="1.1". Interesting.
<?xml version="1.1" encoding="ISO-8859-1"?>
<stuff>data</stuff>
I also tried using Microsoft Internet Explorer and it also failed to process the file: no error message but also no display. Clearly the world is not yet ready for version 1.1. |
"An element's content can be made up of simple text or other elements. Like XML declarations, XML elements can support attributes. ... When you create an XML document, you must enclose all elements inside one overall element, called the root element. " [p. 16]
"Being able to create your own elements from scratch like this has advantages and disadvantages - you're not restricted to a predefined and limited set of tags, but on the other hand, a standard Web browser can understand HTML tags but will have no idea what to do with a user-defined tag." [p. 17]
You can store your data in an XML file and then display it using a separate document called a style sheet. Style sheets can be interpreted by most Web browsers. Thus one needs to learn to create 2 types of file: an XML file that contains the data and a style sheet file that reads the XML file and recodes it into XHTML which can be read by a Web browser.
"There are two kinds of style sheets you can use with XML documents - cascading style sheets (CSS), which you can also use with HTML documents and Extensible Stylesheet Language style sheets (XSL), designed to be used only with XML elements." [p. 18]
A style sheet file simply contains a few statements of the form selector {property1: value; property2: value}. The selector identifies the element that the declaration will apply to.
Here is a schematic image of what I have covered so far:
"An XML document actually can do more than just hold your data; it can let you specify the structure of your data as well." [p. 24]
"There are two main checks that XML processors make: checking that your document is well-formed and checking that it's valid. ... Informally, the main requirements [being well-formed] are that the document must contain one or more elements, and one element, the root element, must contain all of the other elements. In addition, each element must nest inside any enclosing properly. ... An XML document is valid if it adheres to the syntax you've specified for it, and you can specify that syntax in either a Document Type Definition (DTD) or an XML schema." [p. 25]
QUIZ
1. What's the main reason XML has become so popular in the last five years?
XML files are text files that can be easily sent over the Internet.
2. What are the four different types of specifications that W3C publishes?
notes, working drafts, candidate recommendations, recommendations
3. What's an XML element? What's an XML attribute?
An XML element is a name that begins with an opening tag and ends with an closing tag, and which may contain some data between them. Example: <name>Dale</name>.
An XML attribute is a property that may take specific values. Example: font-size="14".
4. What are some of the requirments for an XML document to be well-formed?
There must be at least one root element which contains all of the other elements. Every element must have both an opening and a closing tag. All tags must be properly nested within one another.
5. What are two XML constructs that let you specify an XML document's syntax so it can be checked for validity?
A Document Type Declaration (DTD) or an XML schema.
|
SUMMARY of the session:
12:30 PM This was a great session. I have on the screen, and the book, for 3 hours. This time through, it all made sense. Great. Making these notes acts as a good way for reviewing the material. The important point is that it all makes sense. |
|
|
|
Technology Notes |
7:30 am I plan to carefully read and make notes for chapter 9 of "Dreamweaver 8" by Short & Green. This is the chapter most relevant to my hopes of recreating the structure of these web pages using XHTML and CSS. |
Here is a mind map of the overall book (with expansion of the subtopics for chapter 9):
Chapter 9 Layout
"Unfortunately, standard XHTML doesn't contain any tags that let you position elements easily. ... This problem has caused considerable frustration among Web page designers." [p. 248]
"Fortunately, Dreamweaver 8 has built in functions to help you work in a visual mode to create precise alignment for your text and images. You'll learn how to align your images using tracing images and layers, which you can then convert into tables that can be viewed on nearly any browser." [p. 248]
Exercise 1 Applying a Tracing Image
Done. Easy.
Exercise 2 Adding Layers
Done. Easy.
"Rather than simply placing artwork and text on a page, as you have been doing so far, you can put your content into layers and move it anywhere you want, even using the new guides in Dreamwaver 8 to make sure they're lined up nice and neat." [p. 253]
Exercise 3 Using Layout Tables and Layout Cells
Done. Easy.
"You may have heard that Dreamweaver can convert layers to tables, and tables to layers. Although this is true, we highly discourage it. This conversion process can create some difficult-to-maintain code, and as a general rule does more harm than good." [p. 259]
"Dreamweaver 8 contains an alternate way to create the layout for your Web pages called Layout view. The Layout view feature lets you create layout cells and tables by drawing them exactly where you need them, at exactly the size you want. ... Layout cells and tables ... produce far better code." [p. 259]
Exercise 4 Working with Layout Table Widths
Done. Easy.
SUMMARY of the session:
9:00 am This also turned out to be much easier and more familiar than I expected. But I am not yet sure I am ready to try redesigning this web page. |
|
|
|
Technology Notes |
9:40 am I plan to carefully read and make notes for chapter 8 of "Dreamweaver 8" by Short & Green. This will be the chapter that describes how to create tables for formatting a page. |
Here is a mind map of the overall book (with expansion of the subtopics for chapter 8):
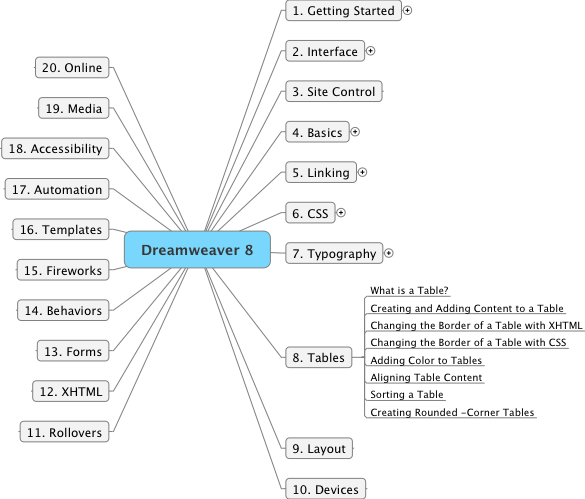
Chapter 8 Tables
"Though CSS offers new (and more semantically correct) ways to lay out your sites, which you will learn about in Chapter 9, 'Layout', tables still serve a very real need for quick and easy layouts that display well across multiple browsers." [p. 198]
"A table is a highly versatile feature in XHTML. It can be useful for organizing data or positioning page elements." [p. 199]
Much of this chapter looks like it will be review for me.
Exercise 1 Creating and Adding Content to a Table
Done. Easy.
Exercise 2 Changing the Border of a Table with XHTML
Done. Easy.
Exercise 3 Changing the Border of a Table with CSS
Done. Easy.
Exercise 4 Adding Color to the Tables
Done. Easy.
Exercise 5 Aligning Table Content
Done. Easy.
Exercise 6 Sorting a Table
Done. Easy.
Exercise 7 Setting Table Widths
Done. Easy.
Exercise 8 Creating Rounded-corner Tables
Skipped. Unecessary, at least for the moment.
SUMMARY of the session:
11:00 am This also turned out to be much easier and more familiar than I expected. |
|
|
|
Technology Notes |
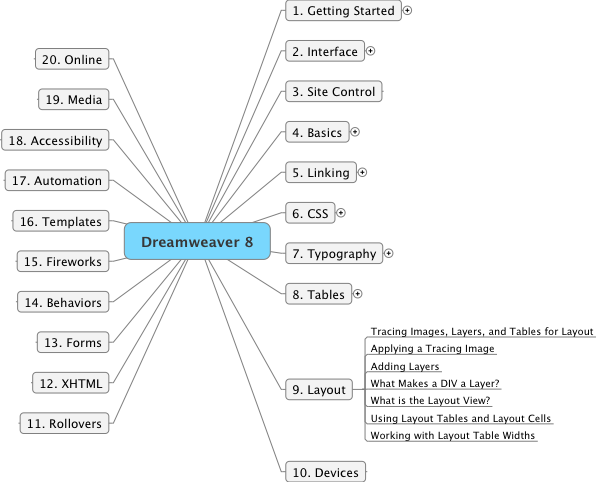
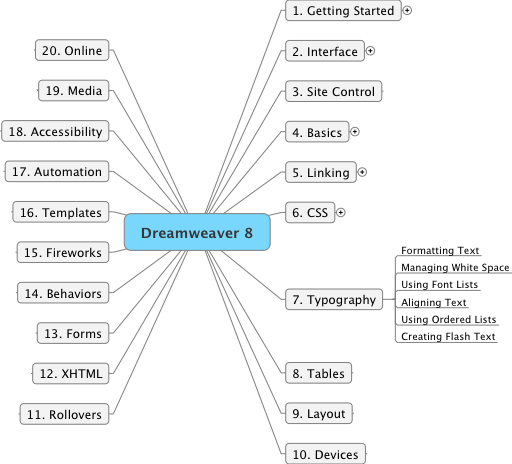
6:40 am I plan to carefully read and make notes for chapter 7 of "Dreamweaver 8" by Short & Green. |
Here is a mind map of the overall book (with expansion of the subtopics for chapter 7):
The last chapter and the next three chapters should cover the core ideas.
Chapter 7 Typography
Exercise 1 Formatting Text with the Property Inspector
Done. Easy. I now have new respect for the heading tags.
"When you change font styling with the Property Inspector, Dreamweaver 8 writes a series of styles for you so you don't have to define any CSS styles at all. As you will see, creating and formatting text with Dreamweaver 8 is just as easy as working with any word processing application." [p. 165]
"If sight-impaired users access your Web page, they might not 'see' your Web page but will instead have a reading device 'read' it aloud. Heading tags can be used by screen readers to make it much easier for visually impaired people to navigate through a Web page." [p. 168]
"If something is a heading, it must be relevant to what immediately follows it, so search engines will give more weight to text in a heading than they will to text in the rest of the document." [p. 168]
Exercise 2 Managing White Space with Margins, Padding, and Line Height
Done. Easy.
"Reading text on a screen is far more difficult than reading it on paper. Because of this low resolution, use lots of white space in order to make your pages easier to read." [p. 175]
Exercise 3 Using Font Lists
Done. Easy. I am not likely to use this feature very often.
Exercise 4 Aligning Text
Done. Easy.
Exercise 5 Using Ordered, Unordered, and Definition Lists
Done. Easy.
Exercise 6 Creating Flash Text
Done. Easy.
"Flash Text lets you use any font you want without worrying whether the visitors to your site will have it installed on their computers. It also lets you easily create rollovers without using any JavaScript.
SUMMARY of the session:
8:00 am This turned out to be much easier and more familiar than I expected. The next chapter looks to be particularly important as I use tables extensively for formatting the layout of my Web pages. |
|
|
|
Technology Notes |
5:10 am I plan to carefully read and make notes for chapter 6 of "Dreamweaver 8" by Short & Green. |
Here is a mind map of the overall book (with expansion of the subtopics for chapter 6):
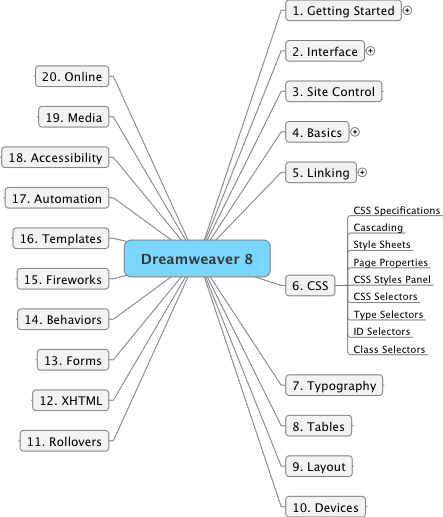
I think that this is the key chapter for the book. Once I have the basic ideas of CSS and how they are created within Dreamweaver I am optimistic that the rest becomes detail.
Chapter 6 Cascading Style Sheets
This is a completion of the exercises begun yesterday.
Exercise 4 Creating ID Selectors
Done. This is the most complex set of steps for an exercise so far. No difficulties, but the number of options is becoming overwhelming.
This exercise set an ID selector for each cell in a 2x2 table. Each cell thus had its own set of style commands. Neat. The first step was to create an ID selector for the entire table and then add the CSS rules for the table. Then click inside each cell, create an ID selector for that cell, and add the CSS rules.
Exercise 5 Creating Class Selectors
Done. Easy.
"Class selectors are probably the most common selector (and the most often abused)." [p. 149]
Exercise 6 Creating CSS Rollovers with Pseudo-Classes
Done. Impressive. Just a few commands and I have a rollover image.
"Pseudo-classes are ... used to assign a style that happens only when an object is in a certain state." [p. 154]
"Pseudo-class selectors are one of the most powerful selectors. Not only can they style an element, but they can change an element's style based on user interaction." [p. 155]
Four of the most common pseudo-classes are:
- :link ( this style is applied to elements that have not yet been visited)
- :visited ( this style is applied to elements that have been visited)
- :hover ( this style is applied when the element is underneath the user's mouse)
- :active ( this style is applied when the user clicks, or activates, the element).
SUMMARY of the session:
6:20 am This was a great chapter. It will take some practice and review before this all becomes a habit, but the power is clearly there, making the effort worthwhile. |
|
|
|
Technology Notes |
7:10 am I plan to carefully read and make notes for chapter 6 of "Dreamweaver 8" by Short & Green. |
Here is a mind map of the overall book (with expansion of the subtopics for chapter 6):
I think that this is the key chapter for the book. Once I have the basic ideas of CSS and how they are created within Dreamweaver I am optimistic that the rest becomes detail.
Chapter 6 Cascading Style Sheets
The W3C has released several recommendations for Cascading Style Sheets. CSS 1 was formalized in 1996, CSS 2 in 1998 and CSS 3 has yet to be formalized. Most browsers do not yet support CSS 3.
"The cascading part of CSS refers to which rules the browser follows when it encounders conflicting CSS information. ... Understanding the cascade and specificity (how specific a rule is) can be a complicated and daunting subject." [p. 109]
"A the very core of CSS are rules. Rules consist of two parts: the selector and the declaration block. A declaration block can contain multiple declarations, which are each made up of two parts: a property and a value, followed by a semicolon. A colon separates the property from the value." [p. 110]
selector {property: value; property: value; ...}
Exercise 1 Understanding CSS and Page Properties
Done. Easy. This was the first time that I have used the Page Properties button on the Properties Inspector window. The exercise showed me how to create an embedded style sheet which is fine if I only want to use the rules for that page, but usually one wants to use the rules for almost all the pages within a web site.
Exercise 2 Exporting and Linking External CSS Files
Done. Easy.
This exercise does a great job of showing the power of external style sheets. A quick change to one external style sheet can immediately change all of the pages that use that style sheet.
The exercise takes an internal style sheet (created in exercise 1), exports it to the assets folder (thus creating an external CSS file), deletes the internal style sheet from the original page and then applies the external CSS flle to all the pages in the site.
Exercise 3 Creating Type Selectors
Done. Following the steps is easy, but the actual values used requires a much deeper understanding of what the various choices mean. The power of making a change to the style sheet and seeing it affect all of the pages is indeed impressive. This exercise illustrated how to change the properties of a simple type selector (e.g. a heading such as h1 or h2, or a paragraph p) .
It also showed a cute trick of using a border command to create a small square bullet in front of a heading.
This section focuses on the CSS Styles panel.
"The CSS Styles panel is one of the busiest and most useful panels in the Dreamweaver 8 interface." [p. 128]
"Type selectors are probably the most efficient way to declare CSS formatting rules. A type selector redefines how to render a particular XHTML tag." (e.g. <p> ) [p. 129]
"You can group as many selectors as you'd like by separating the selectors with commas." [p. 129]
Exercise 4 Creating ID Selectors
Later.
Exercise 5 Creating Class Selectors
Later.
SUMMARY of the session:
9:15 am I was right. This is the important chapter. I now have a clear idea of the power of the CSS approach but am still intimidated by the number of choices that I have for the various rules. Nonetheless, I am excited by the power that will soon be at my fingertips. The next topic of an ID selector will be useful as I learn how to work with an image that I want on each page (particularly the thumbnail image of myself at the top left corner of each page on this site). I have been at this for 2 enjoyable hours. There is something satisfying about sinking one's teeth into a good steak. Now for a break and a little digestion. |
|
|
|
Technology Notes |
5:30 am I plan to carefully read and make notes for chapter 5 of "Dreamweaver 8" by Short & Green. |
Here is a mind map of the overall book (with expansion of the subtopics for chapter 5):
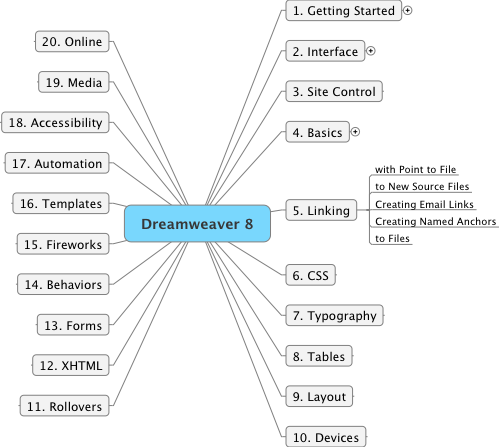
This chapter looks like it is basic Dreamweaver with little new involving XML.
Chapter 5 Linking
Exercise 1 Linking with Point to File
Done. Easy. This is my normal procedure for creating a link.
"The great thing about using this technique is that there is no possible way to accidently set the link to a misspelled or missing file." [p. 82]
"... we strongly urge you to get into the habit of flipping back and forth between Code view and Design view so you increase your exposure to the raw code behind the visual design of your page." [p. 83]
Exercise 2 Linking to New Source Files
Done. Easy. Familiar material.
But the idea of a placeholder image is new to me. Here is one:
![placeholder]()
Exercise 3 Creating Email Links
Done. Easy. A good review.
"Many visitors use a web-based email program [instead of a standard email program such as Microsoft Outlook or Thunderbird]. If they click on an email link they will get an error message. ... There's not a lot you can do about this, so you might want to include the email address directly on the page so visitors can copy and paste the address into their email programs." [p. 93]
The above advice is fine unless the email address happens to be your own personal email address. The concern is that spammers may be able to find your email address by scanning your web page. One solution is to give a fictitious email address with additional information on how the user should change it once the email client is activated.
Example: Here is my email address daleburnett@uleth.ca . When the email client appears please change the dale to d. (There is no such email address as daleburnett@uleth.ca).
Exercise 4 Creating Named Anchors
Done. Easy and familiar material.
Exercise 5 Linking to Files
Done. Easy and familiar material.
SUMMARY of the session:
6:40 am This took longer than just a quick skim would. However I did learn about placeholder images and I was able to review material on email links as well as anchors and pdf files.
The next chapter on Cascading Style Sheets is the one I am looking forward to! |
|
|
|
Technology Notes |
7:00 am I plan to carefully read and make notes for chapter 4 of "Dreamweaver 8" by Short & Green. |
Here is a mind map of the overall book (with expansion of the subtopics for chapter 4):
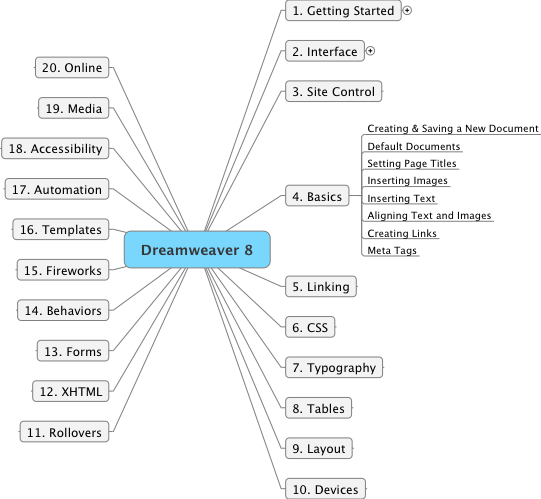
All of the sub-topics in this chapter have a blend of something I am familiar with as well as new material based on an XML approach. I think it best to follow this chapter closely and see where I am when I have completed the exercises.
Chapter 4 Basics
Exercise 1 Creating and Saving a New Document
Done. Easy. The new step is creating it from the menu bar: File -> New and then making sure that the Document Type is XHTML 1.0 Transitional. The DOCTYPE tells the browser which version of HTML or XHTML it should use to render the page.
"Most web servers recognize the index.htm (or index.html) file as the default home page." [p. 59]
Exercise 2 Setting Page Titles
Done. Easy and familiar material.
Exercise 3 Inserting Images
Done. Easy and fascinating. Until now I have always used a click and drag to place an image from the Files panel onto the page. This exercise recommended using the Assets panel. Place the cursor where you want the image to appear on the page, then click on the image in the Assets panel and then click on the Insert button at the bottom of the panel. Be sure that you fill in the Alternate text field when the pop-up window appears. Both approaches ensure that the image is within the site folder, which is critical.
I am going to try using this new approach when adding images to this web site.
"Get into the habit of looking at the Code view of your page as often as possible. It's a great way to get more comfortable with what goes on behind the scenes in the XHTML code." [p. 65]
Exercise 4 Inserting Text
Done. Easy and familiar material.
Exercise 5 Aligning Text and Images
Done. Easy and familiar material.
Exercise 6 Creating Links with Images and Text
Done. Easy and familiar material.
Exercise 7 Inserting <meta> Tags
Done. This was new material for me. I have never paid much attention to this topic.
I have now added two new meta tags to this page: one for keywords, the other for a description.
SUMMARY of the session:
8:50 am So far this has been a basic review. I have learned two new ideas. One is the use of the Assets panel and the other is the value of having meta tags to help search engines find the page. |
|
|